المشكلة
مع الانتشار الرهيب لتطبيق الواتساب أصبح هو المنصة الرئيسة لتناقل رسائل الأخبار والطرائف وكذلك الإشاعات، وتتنوع تلك الرسائل ما بين رسائل نصية و صور و مقاطع فيديو. من يستخدم التطبيق ولديهم معارف وأصدقاء سيكتشف عاجلاً أو آجلا أن هاتفه قد اصبح ممتلئ بملفات الوسائط المتعددة والتي استقبلها عبر التطبيق من رسائل مباشرة أو من المجموعات.
عندما يظهر لك الهاتف أن الذاكرة على وشك الامتلاء وأن عليك التخلص من بعض الملفات والتطبيقات التي لا تحتاجها، بالنسبة لي الجأ أولا لحذف ملفات الفيديو التي استقبلها الواتساب منذ فتره طويلة (مثلا قبل 3 أشهر)، لأنها غالبا عديمة الفائدة وتستهلك مساحة كبيرة جدا. وإن كنت مثلي فأعتقد انك اكتشف صعوبة عمل ذلك إذ تحتاج إلى فتح برنامج مدير الملفات أو الاستوديو ثم البحث عن الملفات القديمة وحذفها، أو حذف جميع الملفات ولكن قد تكتشف لاحقاً ان هناك صورة او فيديو قد استقبلته حديثا وتحتاج الرجوع له مره أخرى.
الفكرة والحل
لذلك قررت عمل تطبيق يسهل على عمل ذلك الشي بحيث احدد الزمن الذي أريد وبضغطة زر يحذف جميع الملفات القديمة، فنفذت التطبيق و أطلقت عليه اسم “منظف الواتساب” أو “WhatsCleaner”
![واجهة التطبيق الانجليزية]()
فكرة التطبيق سهله جدا وبسيطة، إذ قمت أولا بحصر مواقع الملفات التي يحفظها التطبيق على الجهاز وهي في مجلدات لكل نوع من أنواع الوسائط مثلا “WhatsApp Images” للصور و “WhatsApp Video ” لمقاطع الفيديو وهكذا وتحفظ جميعها في مجلد خاص بالواتساب تحت المسار التالي WhatsApp/Media/ ويحفظ هذا المجلد اما في الذاكرة الداخلية للجهاز، او في الذاكرة الخارجية (SD Card) اذا كان الجهاز لا يحتوي على ذاكرة داخلية أو ان صاحب الجهاز قد نقل ملفات الواتساب للذاكرة الخارجية
مثال لمواقع المجلدات في جهازي [اضغط على الصورة لتراها بحجم أكبر]:
![واجهة التطبيق العربية]()
بعد ذلك يقوم التطبيق بالبحث في الملفات وفرزها حسب تاريخ إنشاءها (أو استقبالها) ويقوم باختيار الملفات التي تم إنشاءها قبل الزمن الذي حدده مستخدم التطبيق. مثلا: عند اختيار مدة “3 أشهر” فسيقوم التطبيق باختيار جميع الملفات التي استقبلت قبل ثلاث أشهر وسيعرض عددها ومساحتها في واجهة التطبيق، فكما في الصورة أعلاه نجد أن هناك 13 ملف فيديو بمساحة 149 ميقايايت تم استقبالها قبل 6 شهور.
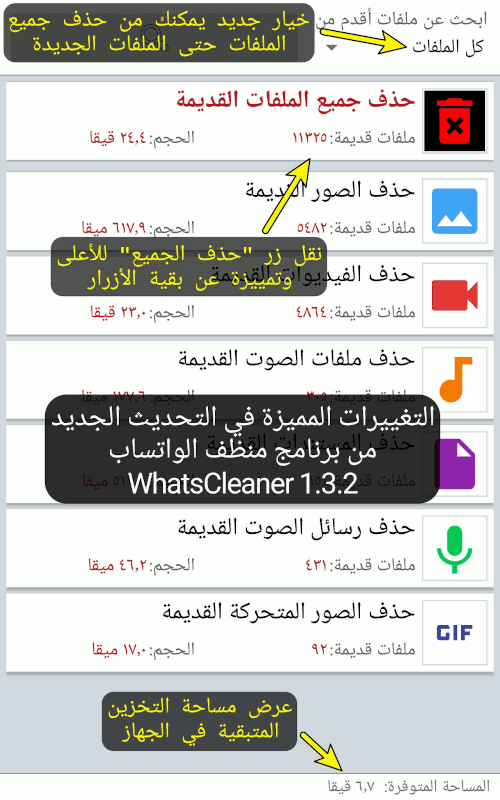
الصورة التالية تبين احدث نسخة من التطبيق وعليها شرح يوضح التغييرات الجديدة التي نفذتها بناء على ملاحظات عدد من المستخدمين:
![واجهة التطبيق العربية]()
رابط التطبيق على متجر الأندرويد
![]()
المشكلة الحالية
في فتره العمل على التطبيق كنت أقوم بصيانة خادم النسخ الاحتياطي الخاص بي وفي نفس الوقت كنت اخطط لرفع ملفات التطبيق البرمجية “Source code” على موقع github وجعل التطبيق مفتوح المصدر ودعوة المطورين للمساهمة في تطويره وتحسينه خاصة أنني لا اجيد تصميم الواجهات الرسومية. فقمت بحذف ملفات المصدر الخاصة بالتطبيق اعتقادا مني بأني قد رفعتها على github ولم انتبه لذلك حينها، باختصار ضيعت ملفات المشروع الأساسية و النصوص البرمجية و الصور الأصلية …الخ (حاولت أن استعيد الملفات المحذوفة بعد أن اكتشفت ما حصل لكن ذلك كان بعد فتره طويلة فضاع معها أمل استعادة الملفات).
قمت بمحاولات لفك ملف التطبيق apk الموجود في متجر الاندرويد ومحاولة استخراج النصوص البرمجية بما يسمى بالهندسة العكسية (Reverse engineering) وهي تعتبر نوعا ما سهلة في تطبيقات الجافا لكن تلك الطريقة تصلح لعمل تعديلات بسيطة وليست مناسبة للتعديلات الكبيرة و وجدت انه من الأسهل كتابة التطبيق من الصفر بدل من تعديلة بهذه الطريقة.
لا يزال التطبيق يعمل إلى الآن ويؤدي المطلوب، مع أن لدي عدد من الأفكار للتطوير لكن ليس لدي الوقت الكافي لبدء المشروع من الصفر خاصة أن تصميم الواجهات الرسومية يعتبر من نقاط الضعف لدي وتستغرق مني وقت طويل، لذلك لا أتوقع أن اعمل عليه في الوقت الراهن لكن إذا لدى احد رغبة في العمل فأنا مستعد للمساهمة وتقديم جميع الأفكار اللازمة لتنفيذ التطبيق.


 وفي الجانب الآخر نجد زر خاص باستدعاء مساعد قووقل (Google Assistant) لتنفيذ بعض الأوامر أو البحث عن معلومات بشكل سريع.